Your drainage tube, or catheter, provides both a way to drain fluid out of your body and a way for us to evaluate drainage requirements. Proper care of the catheter is therefore very important to ensure healing that is faster and without complications.
GLOSSARY OF TERMS:
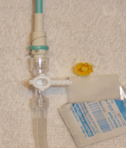
CATHETER: The tube that enters your body
SKIN ENTRY SITE: The hole where the tube enters your body
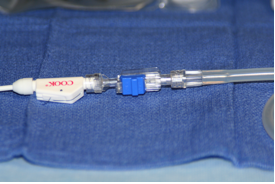
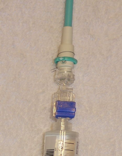
FLOW SWITCH/STOPCOCK: The device that connects the drainage bag extension tube to the catheter.
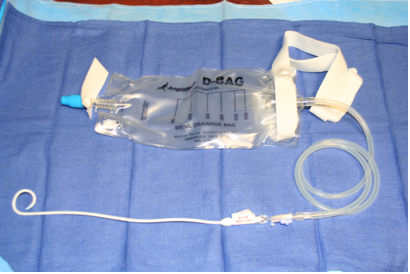
DRAINAGE BAG WITH EXTENSION TUBING: Collects the fluid draining from catheter
External Drainage
If the Interventional Radiology Service instructs you to drain externally, then the drainage should remain connected to the catheter unless emptying or cleaning the bag or showering. Empty the bag whenever it is getting full or daily. Clean it weekly like you would a coffee maker, with 1 part white vinegar and 1 part tap water, to control odor. To remove the bag for emptying, cleaning, or showering.
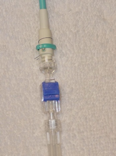
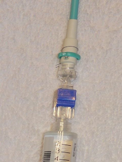
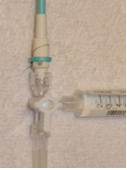
IF YOU HAVE A 2-WAY FLOW SWITCH (ILLUSTRATION BELOW)
STEP 1: Put the 2-way flow switch into the “OFF” position so that drainage of fluid doesn’t occur while the bag is not attached.
STEP 2: Unscrew the drainage bag extension tubing counterclockwise from the flow switch.
STEP 3: To re-attach the bag, screw the drainage bag extension tube clockwise onto the 2-way flow switch and put the flow switch into the “ON” position. Do not leave the bag unattached for more than an hour at a time.
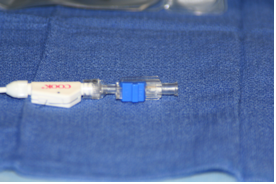
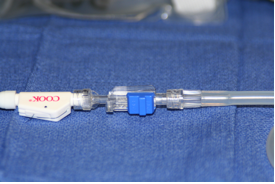
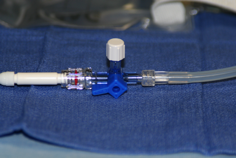
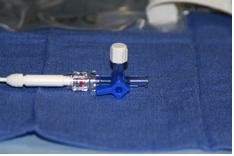
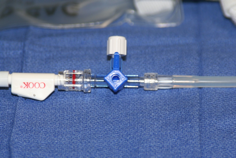
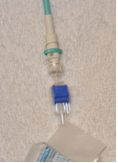
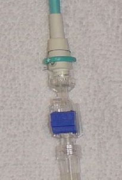
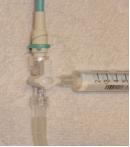
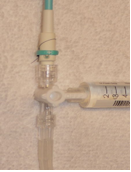
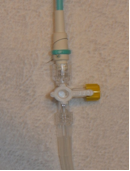
IF YOU HAVE A 3-WAY STOPCOCK (ILLUSTRATION BELOW):
STEP 1:Turn the stopcock lever toward the skin entry site.
STEP 2:Unscrew the drainage bag extension tube from the stopcock counterclockwise.
STEP 3:Screw the drainage bag extension tube clockwise onto the stopcock and turn the lever perpendicular to the catheter and extension tubing.
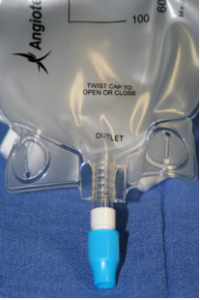
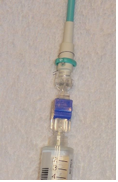
TO EMPTY DRAINAGE BAG:
STEP 1:Repeat Steps 1 and 2 above
STEP 2:Unscrew blue outlet cap on drainage bag counterclockwise and empty contents into the toilet. When empty, screw the blue outlet cap clockwise until snug.
STEP 3:Repeat Step 3 above.
Internal Drainage
If the Interventional Radiology Service instructs you to drain internally, then you will not have to attach a drainage bag unless the following occur:
- Excessive drainage around the tube at the skin entry site.
- Unexplained fever (oral temperature greater than 100.4 degrees Fahrenheit)
If either of these occurs, call the Interventional Radiology Service at the numbers below the next business weekday or between 8AM-5PM on the weekend or holidays.
Flushing the Drainage Catheter
If you are instructed to flush the catheter, do so every day or every other day using the instructions below:
2-way Flow Switch
3-way Stopcock
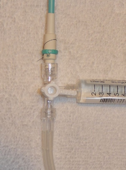
syringe) of fluid through the drainage catheter into your catheter, into your body. Stop if any resistance is encountered or pain is felt.
Gently flush 5 mL (1/2 syringe) of fluid through the tube toward the bag.
GENERAL CATHETER CARE
- You must keep the hole in the skin where the tube enters your body clean and dry. In general, showering is OK as long as you dry it off immediately afterwards. However, bathing or swimming, where the hole is actually underwater, is prohibited because it can cause infection.
- Keep the hole where the tube enters the skin covered with a couple of gauze pads or a Tegaderm. Tegaderm is a breathable transparent film dressing that protects against water getting in but allows perspiration to get out. A 4 x 4-inch Tegaderm is available through Walgreen’s online, which delivers in 3 business days, at a cost of about $1.50 per day. 4 x 4-inch gauze at Walgreen’s costs $6.49 for 25 pads. You will need tape if you use gauze but not if you use Tegaderm. Either is fine.
- Cleaning the hole where the tube enters your body should be done daily or every other day after showering and before covering it. This can be done with a cotton swab and hydrogen peroxide.
QUESTIONS OR PROBLEMS WITH DRAINAGE CATHETER
Call the Interventional Radiology Service the next business weekday or between 8AM-5PM on weekends and holidays for the following reasons:
- The adhesive dressing or sutures securing the tube to the skin come off or loosen.
- There is excessive drainage around the tube where it enters the body.
- There is a sudden decrease in drainage from the drainage tube
INTERVENTIONAL RADIOLOGY SERVICE CONTACT INFORMATION
WEEKDAYS 7AM-6PM (INTERVENTIONAL RADIOLOGY SUITE):
PIEDMONT HOSPITAL: 404-605-3371
WEEKNIGHTS, WEEKENDS, AND HOLIDAYS (ANSWERING SERVICE): PIEDMONT HOSPITAL: 404-352-1409